Homemade Nut Milk
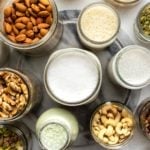
Make your own nut milk at home with these super simple and easy steps! This recipe will work for any nut or seed listed above or in the nut milk guide.
- Prep Time: 5 Minutes
- Cook Time: 0 Minutes
- Total Time: 5 minutes
- Yield: 4 cups 1x
- Category: Drink
- Method: Blender
- Cuisine: American
Ingredients
Scale
- 1/2+ cup nuts or seeds, soaked* if desired
- 4 cups filtered water
- Pinch of salt
- Optional add-ins: maple syrup, medjool dates, cinnamon, vanilla extract, or any other sweeter/spice to taste
Instructions
- Add the nuts, water, and a pinch of salt to the base of a high-speed blender with any additional add-ins. Blend on high speed for 90 seconds, or until creamy and frothy.
- Place a fine mesh nut milk bag over a large glass bowl and pour the blended mixture into it. Grasp the bag with one hand and slide it from the top of the bag to the bottom to create a small “ball”. Slowly twist the bag to release any additional liquid. Compost the nut pulp, save it for another recipe, or simply discard it.
- Pour the nut milk into glass jars, seal, and store in the fridge for 4 to 5 days. Extra nut milk can also be frozen in ice cube trays and used in smoothies, or re-thawed and used in other recipes.
Notes
- Creaminess: 1/2 cup of nuts will create a creamy, enjoyable milk, but you can use up to 2 cups of nuts if you’d like your milk to be creamier (refer to the creaminess scale in this post / the nut milk guide)
- Soaking: nuts/seeds can be soaked for 4 to12 hours before blending, if you so desire. If you do soak your nuts, drain and rinse them well before blending.
- Straining: for the smoothest texture we recommend straining all milks except for cashew milk, pumpkin seed milk, and hemp milk. However, if you don’t mind some extra fiber in your milk, straining is not necessary.
Find it online: https://frommybowl.com/homemade-nut-milk/