Disclosure: This post may contain affiliate links. I may earn a small commission for my endorsement, recommendation, testimonial, and/or link to any products or services from this website.
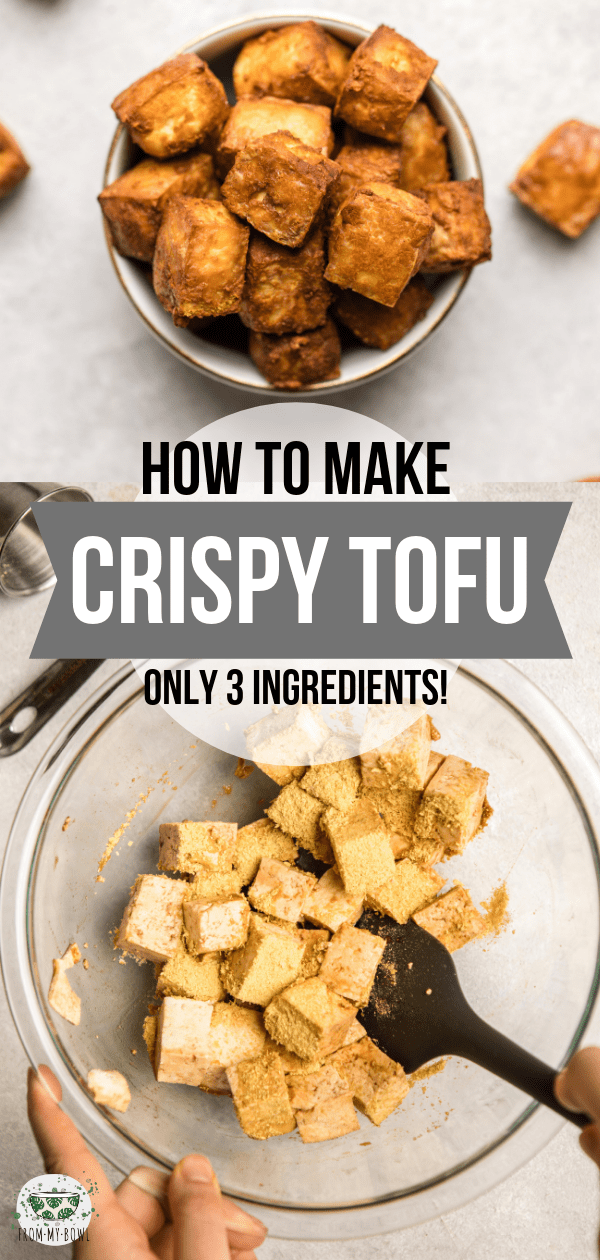
Learn how to make the best Crispy Tofu with this easy and yummy recipe! Made with only 3 ingredients, this Tofu is Vegan, Gluten-Free, and Oil-Free.
Tofu: some people love it, some people hate it. I, however, believe that the people who hate it just haven’t had it prepared in the right way.
But no worries, friends – what if I told you that you could have the best, easiest, and crispiest Tofu EVER…with only 3 ingredients total and super simple steps?! Well, I’m tellin’ ya. This crisp-on-the-outside, soft-on-the-inside Tofu is about to change. your. life. And become a regular staple in your recipe rotation. 😉
Tofu can be bland, and it can be mushy – but it all comes down to the way you prepare it. As a vegetarian since birth, I’ve had more than my fair share of this soy-based protein. I’ve experimented with countless different ways to prepare it, and this method is by far my favorite.
I’ve included my basic recipe for Crispy Tofu in a few other recipes on this blog, but wanted to make a complete run-down of the steps + method for you all, including my tips and tricks. So, shall we?
Step One: Press and Cube your Tofu
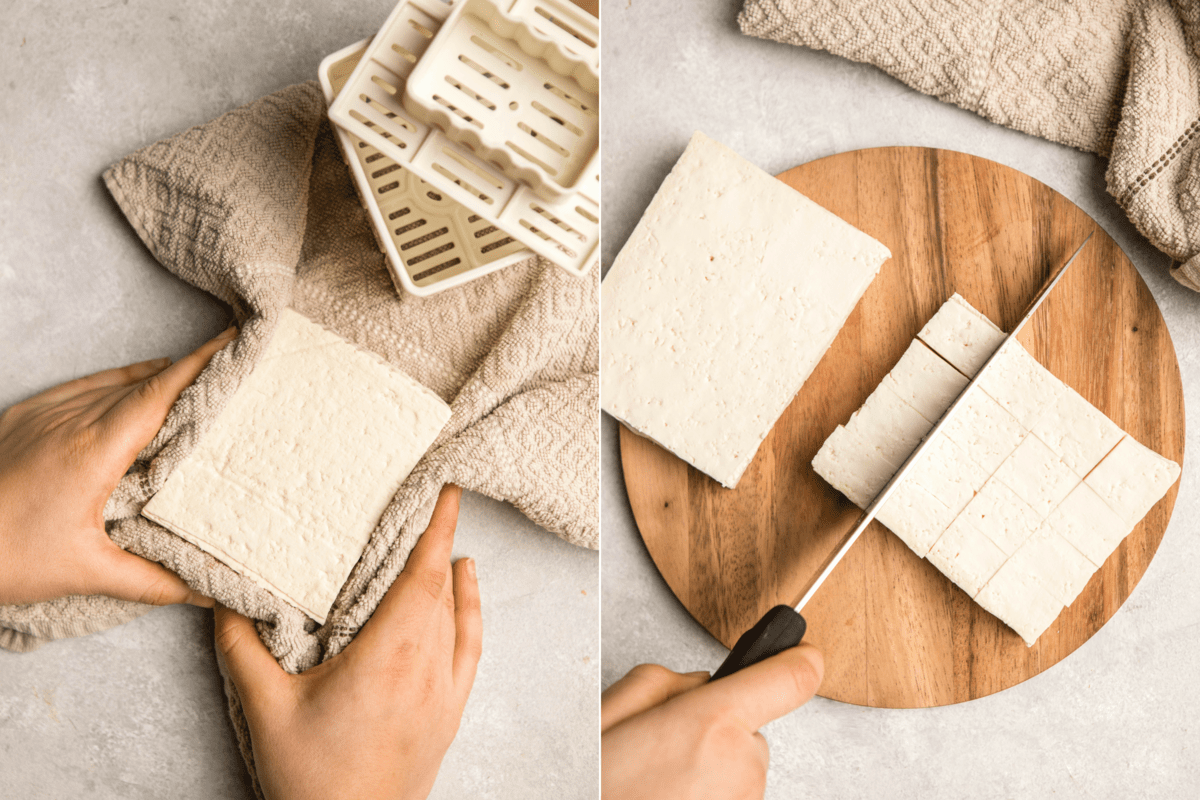
You’ll need one 14 oz. block of Extra Firm Tofu for this recipe. Firm will work too, in a pinch. Remove the Tofu from it’s package and drain any extra liquid off, then gently press as much liquid out of it as possible. I like to use a Tofu Press, but you can also use a couple of towels and a heavy object if you don’t have one.
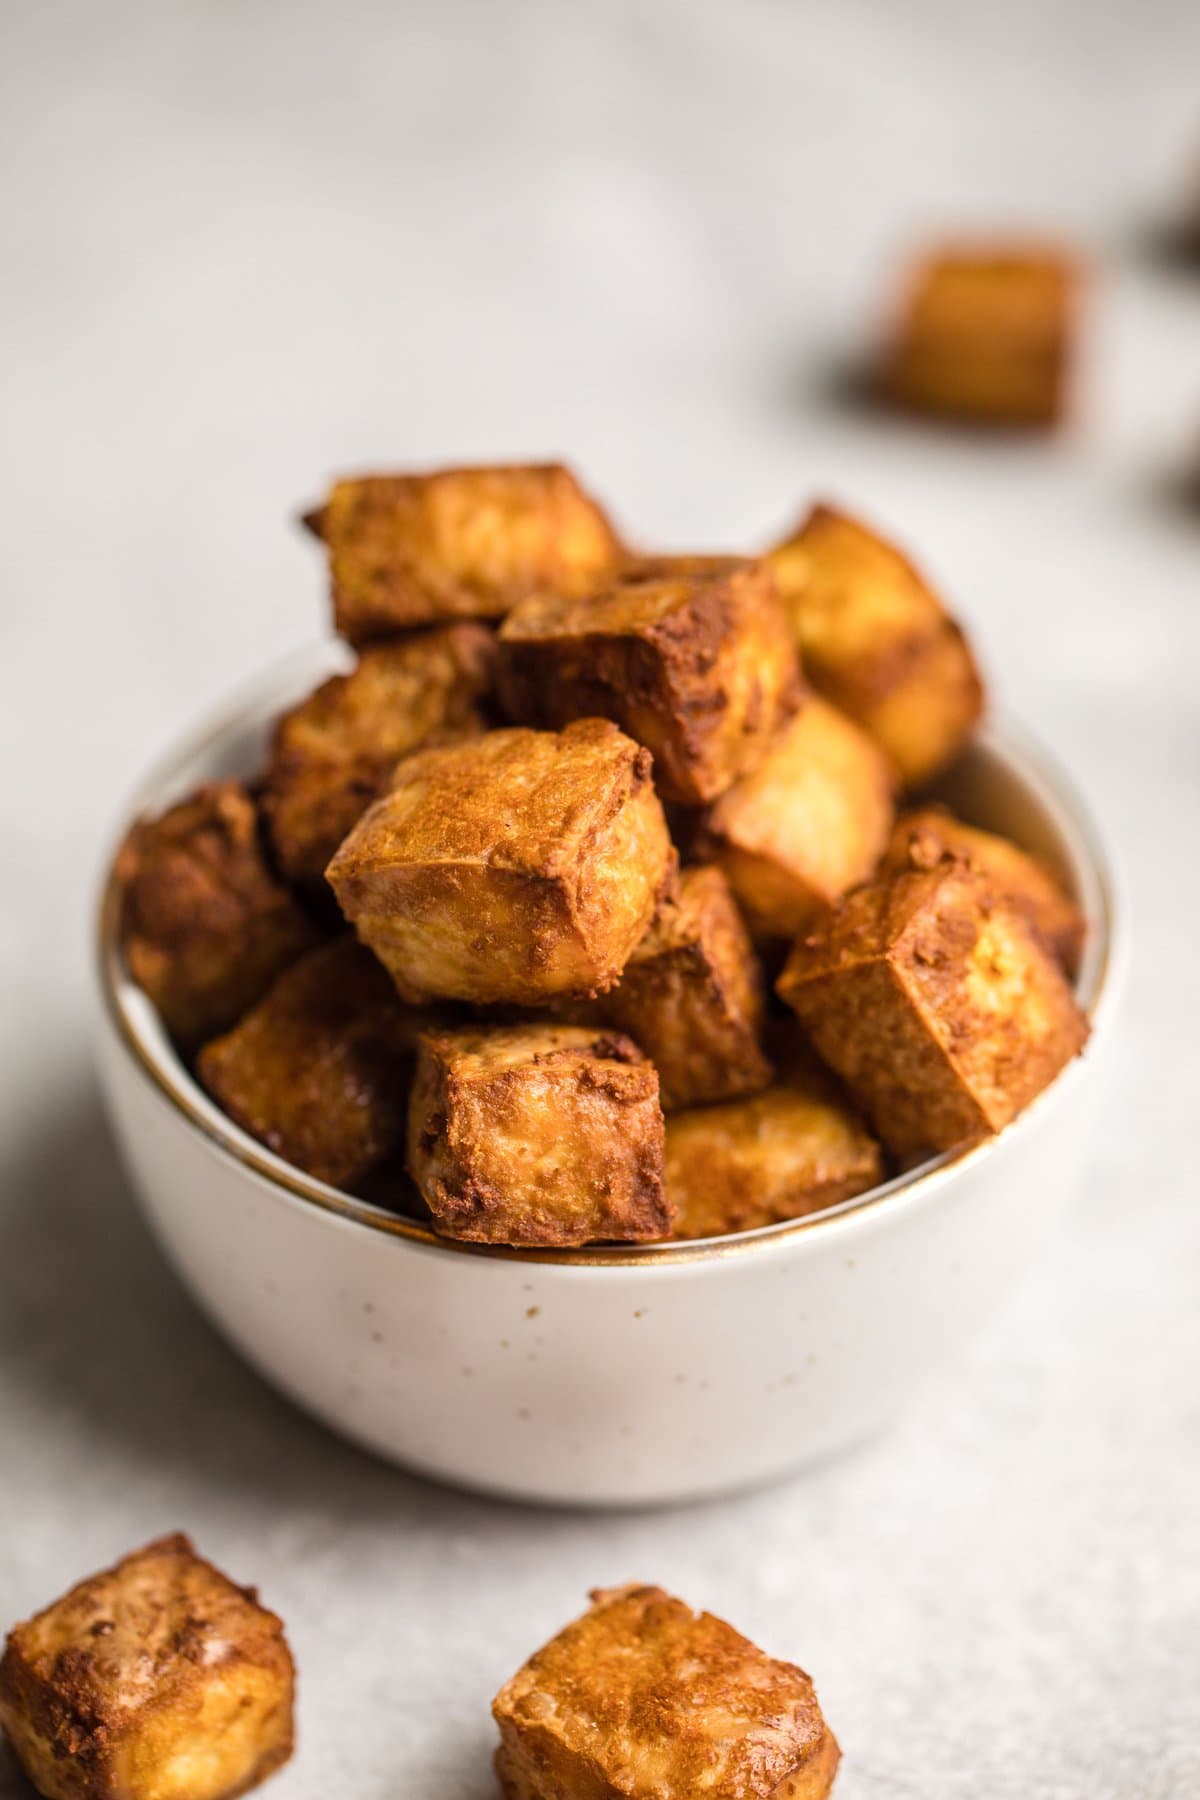
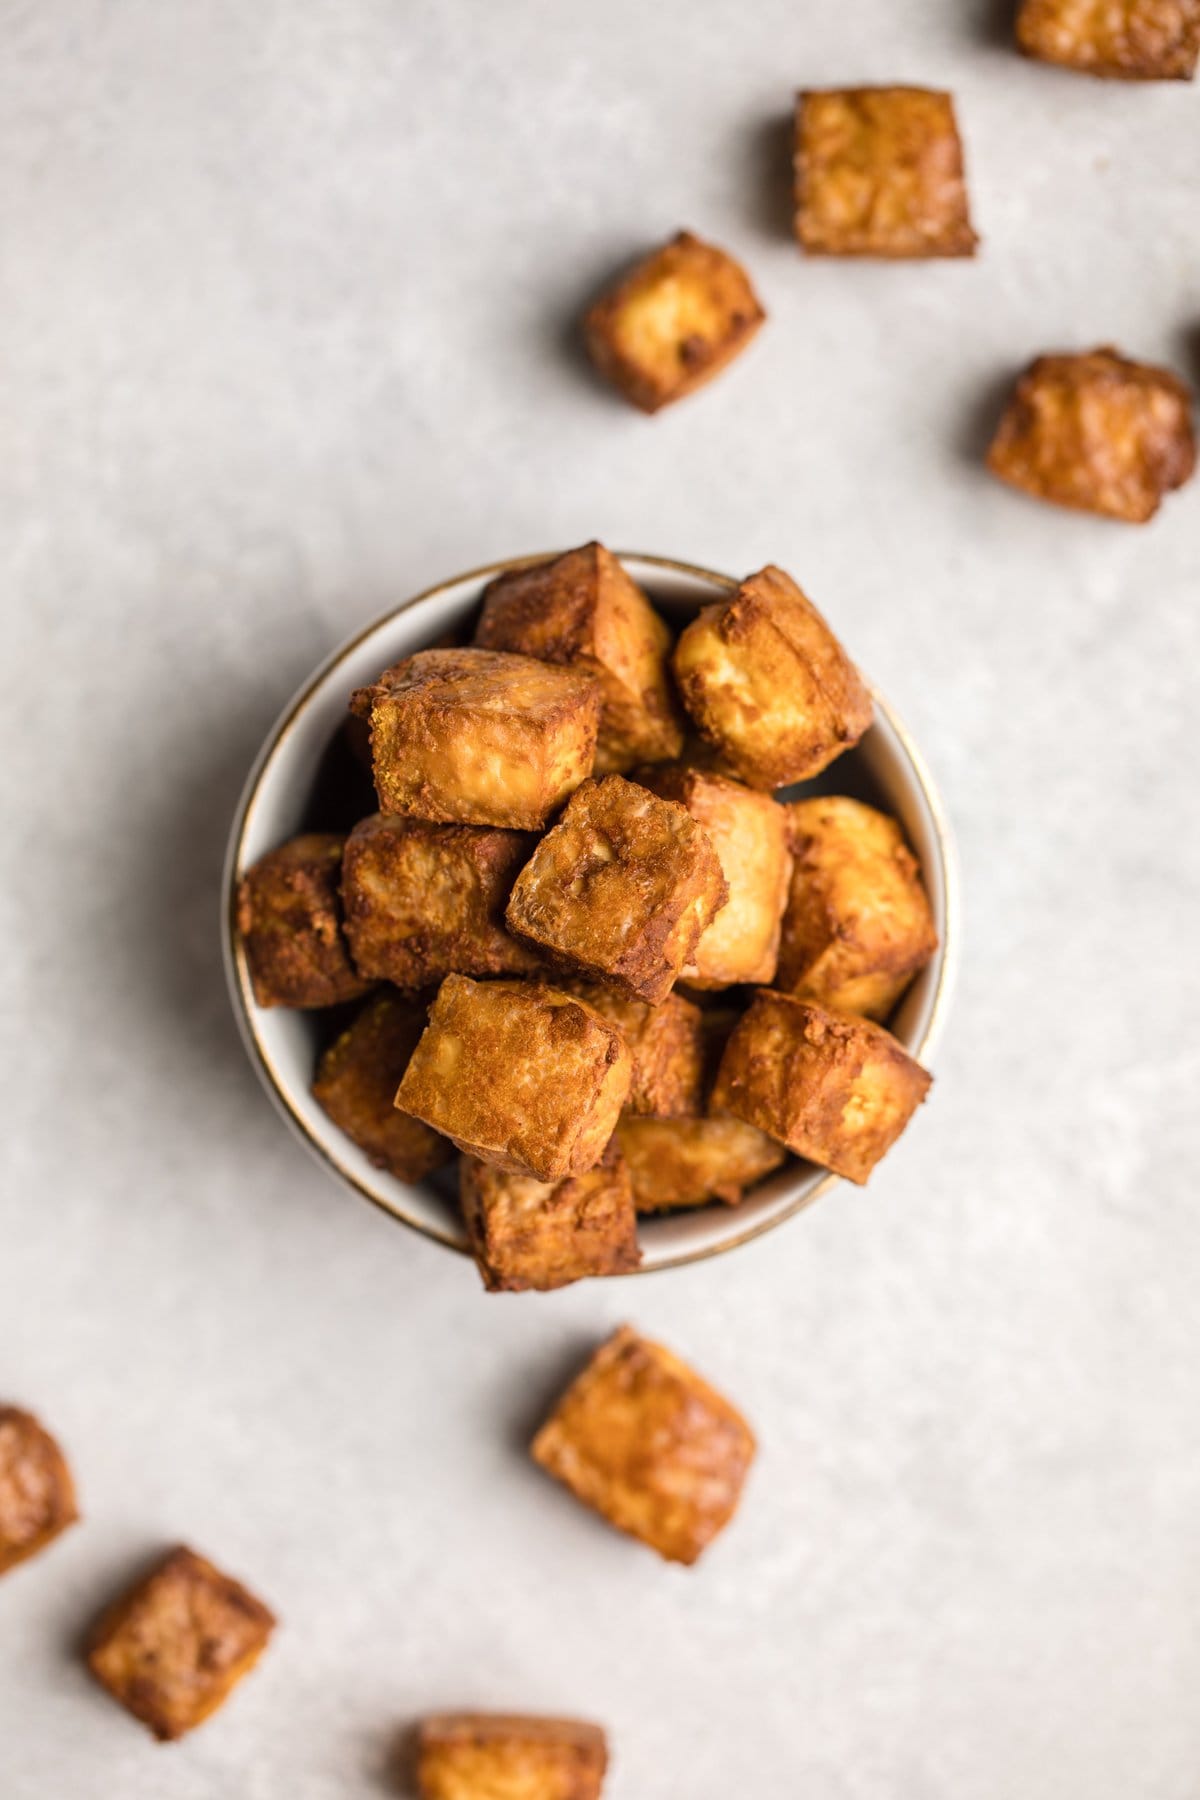
Then, cube your Tofu – I like to cut the thickness of the block in half, then cut each half into 16 “cubes.” These are the perfect bite-sized pieces for your Crispy Tofu!
Step Two: Toss with Tamari, then Nutritional Yeast
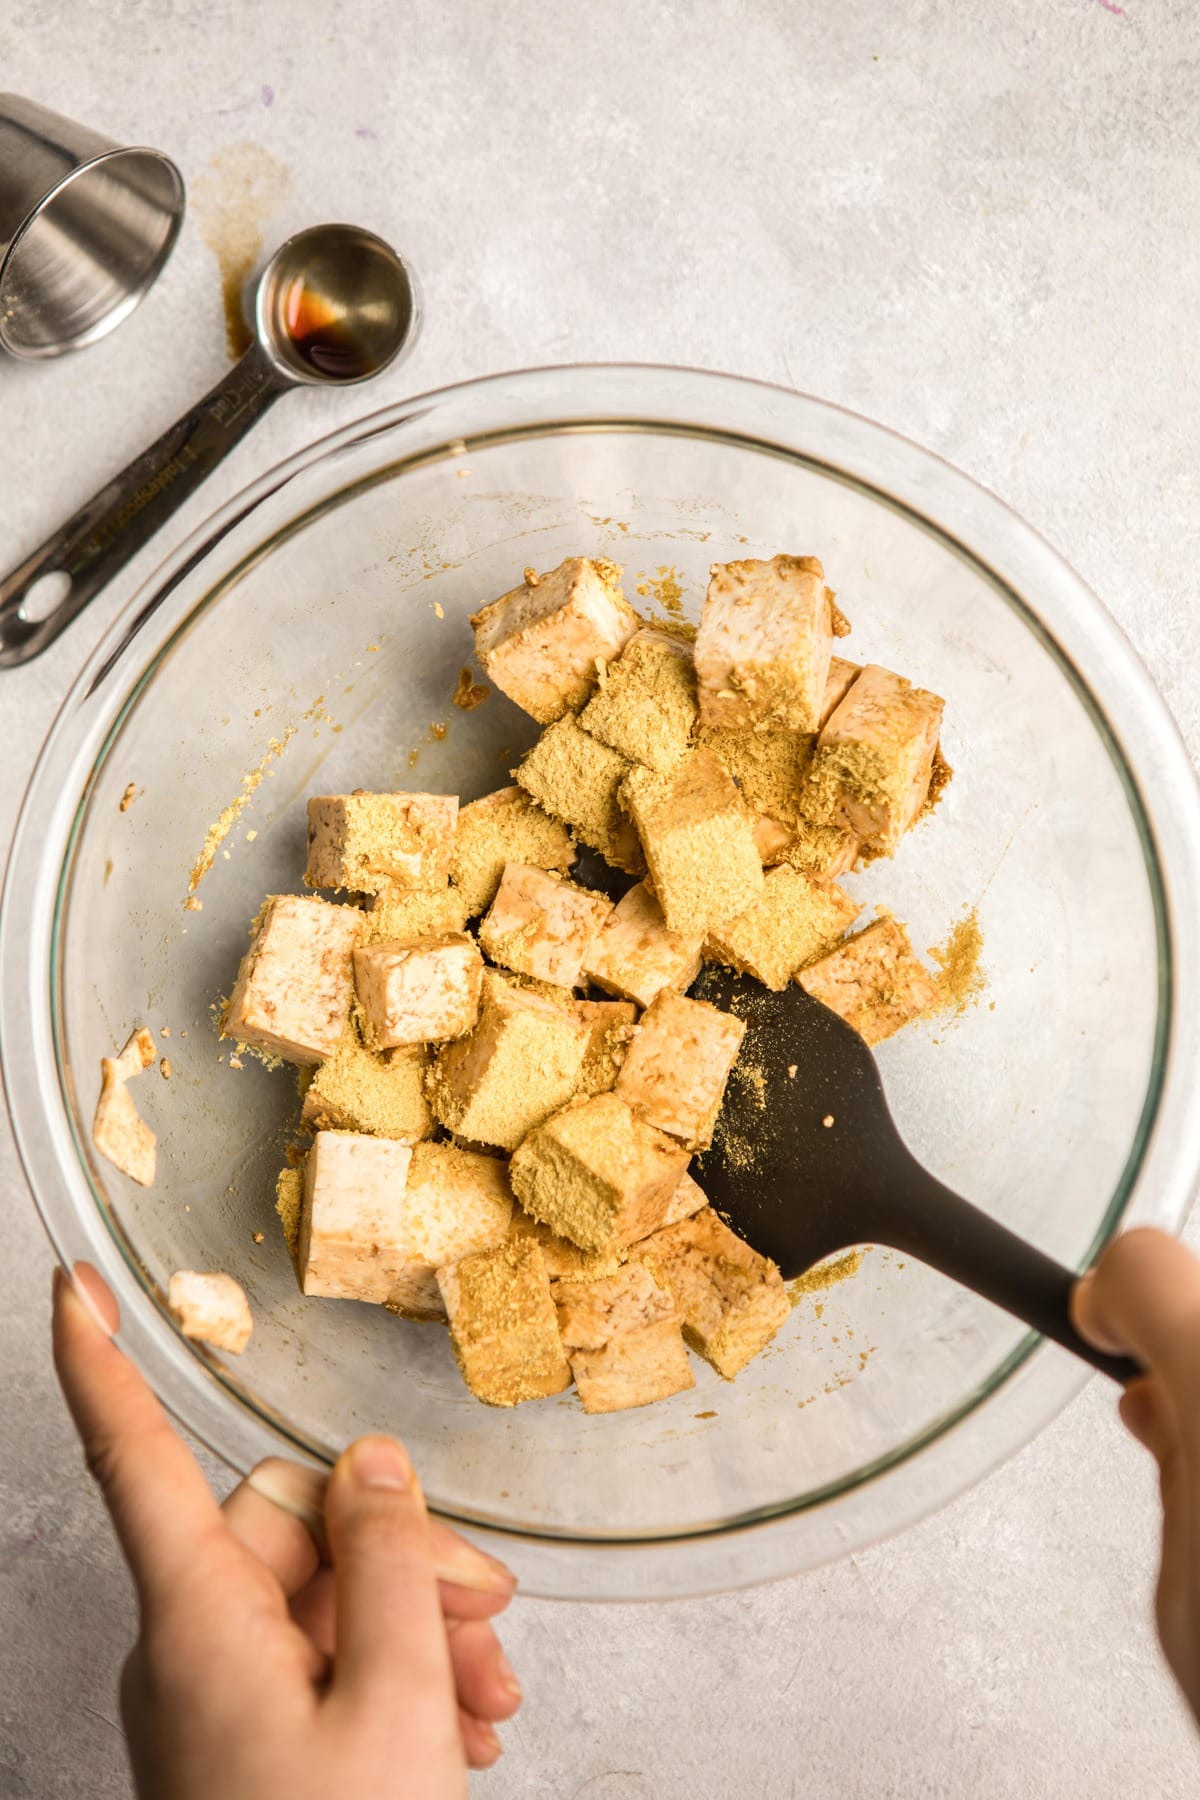
Place the Tofu cubes in a large glass bowl, then drizzle 1 tbsp of Tamari over them. Now that the Tofu has been pressed, it’s much more likely to absorb the Tamari flavor (and taste less bland). I like to use a large spatula to gently toss the Tofu, so the cubes don’t break. I prefer the flavor of Tamari in this recipe, but you can also use Liquid Aminos or Soy Sauce.
Finally, we can’t forget about our third and final ingredient – Nutritional Yeast! Coating those cubes in at least 2 tbsp of those golden flakes helps to (1) absorb any extra liquid and give a nice, crispy crust, and (2) adds a ton of Umami + depth of flavor to the recipe. Honestly, the more “Nooch” you toss in there, the merrier!
Step Three: Bake Until Crispy!
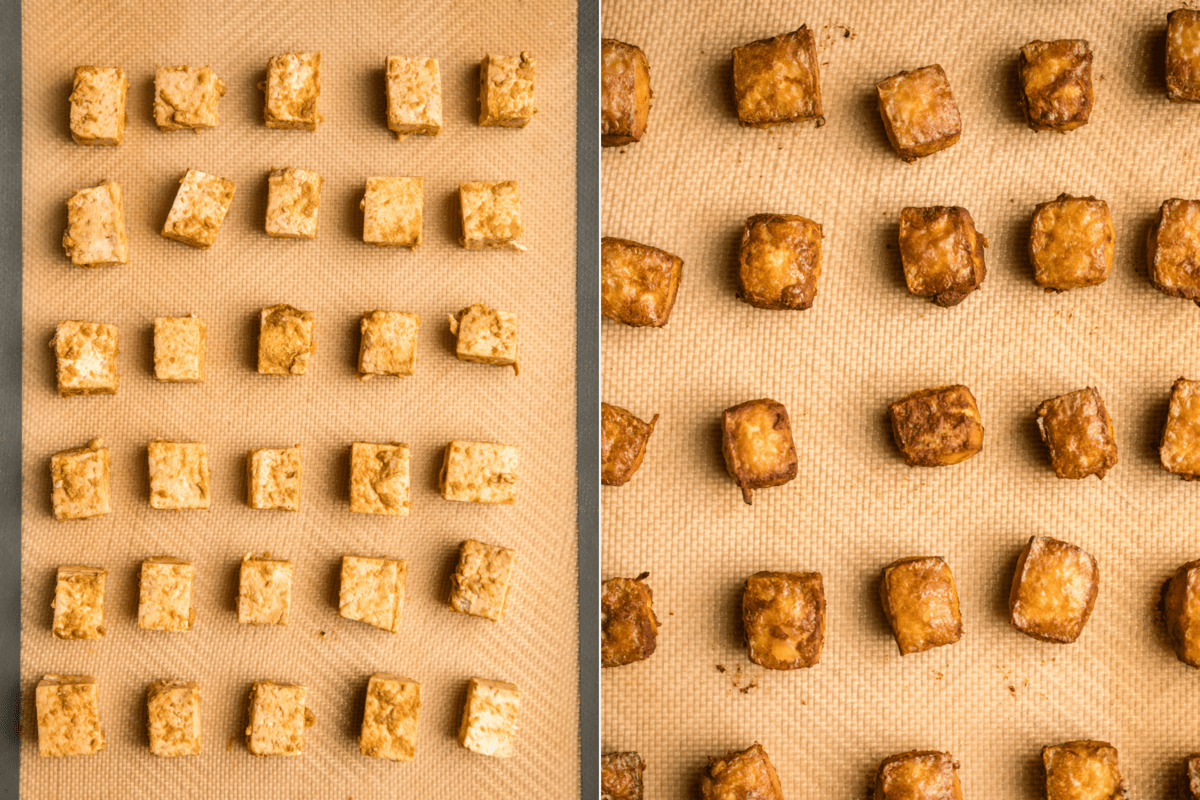
Spread your Tofu on a Silicone Baking Mat, leaving enough space between each cube. Bake at 425F for 20 minutes, then carefully flip the Tofu and bake for an additional 20-30 minutes, depending on how crispy you like it. I strongly recommend using the Silicone Mat here – it adds an extra layer of caramelization that you just can’t get with parchment paper!
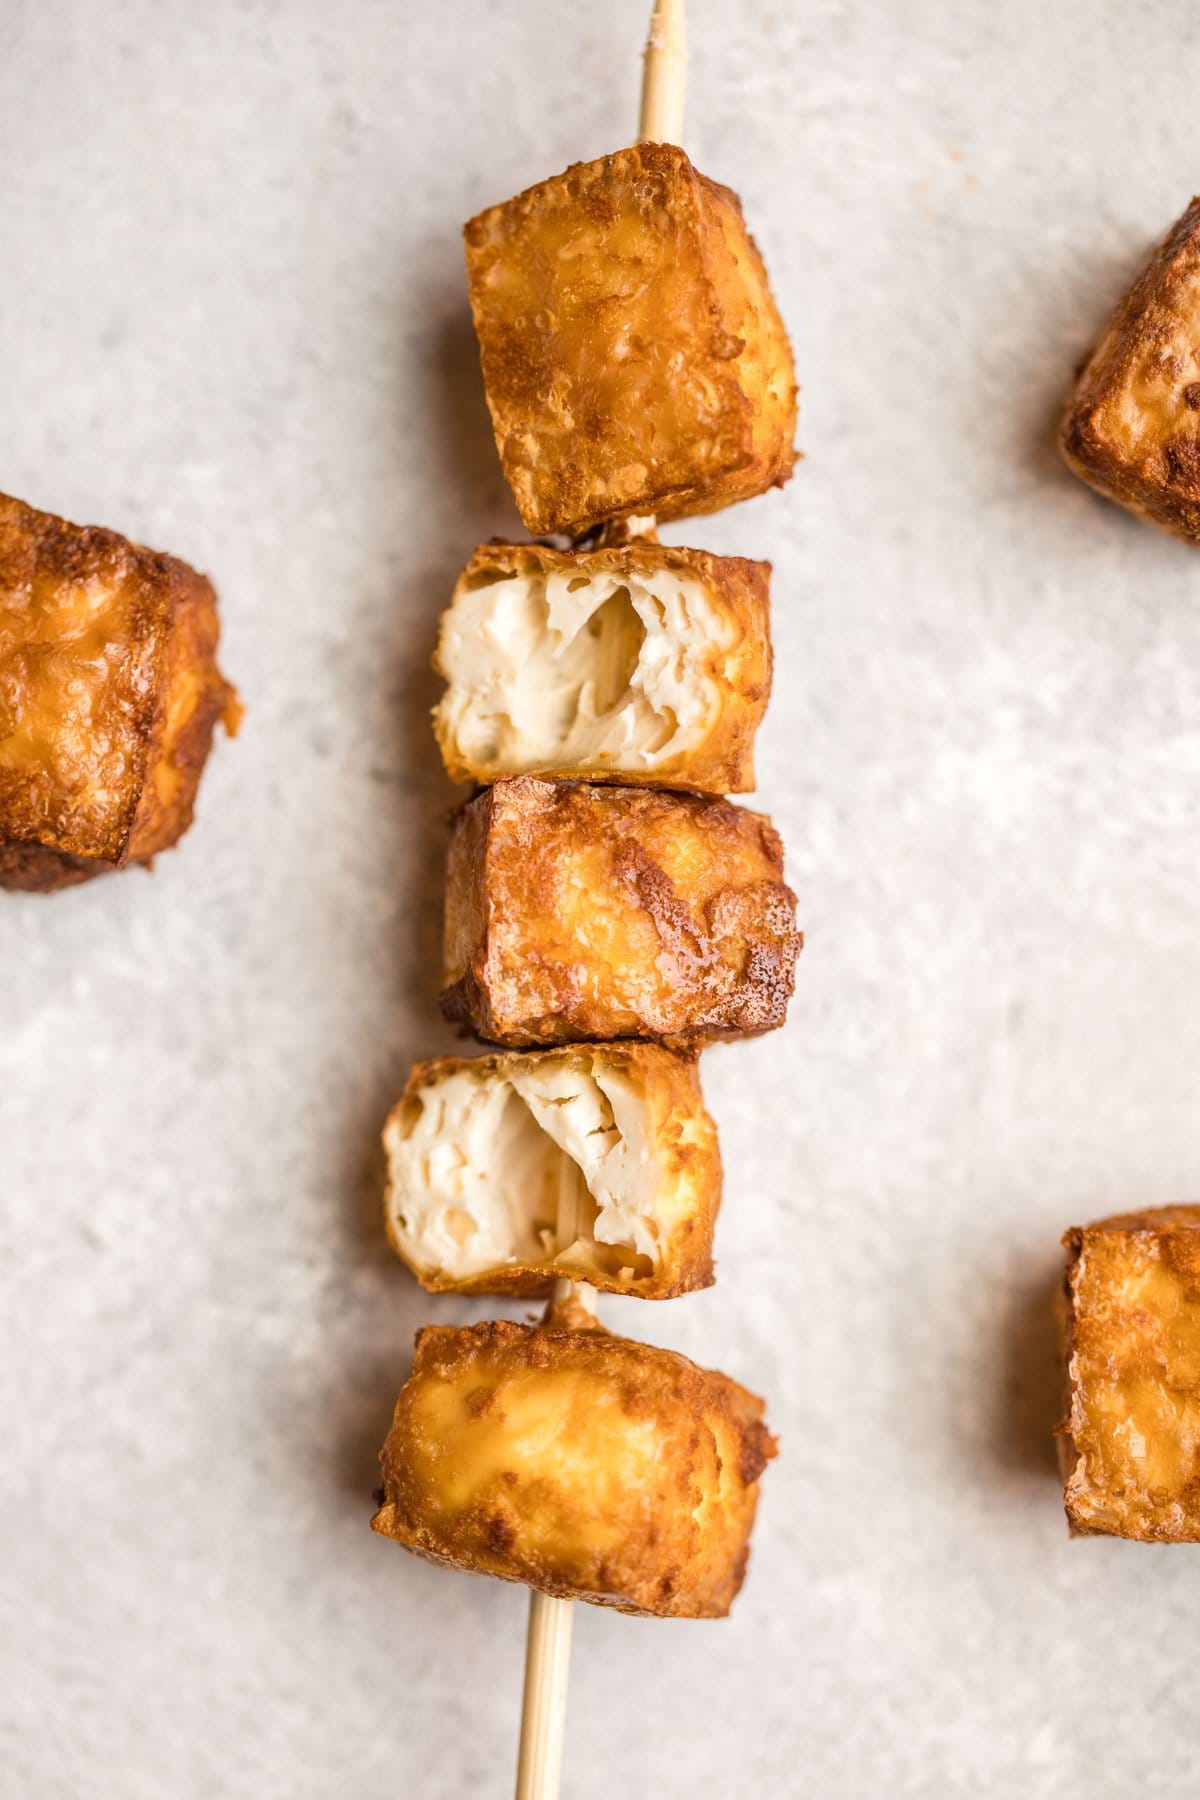
After your Tofu comes out of the oven, it’s all nice, crispy, and ready to devour. I mean….can we look at those golden cubes?
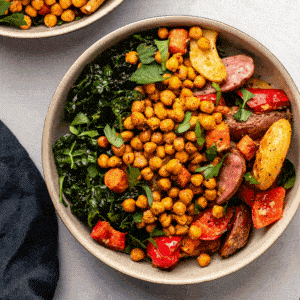
This Crispy Tofu tastes so delicious that I can (have, and will) eat it plain, but it’s also great dipped in to sauce or used as a bowl-topper! If you’re looking for more ways to use it, you’ll also love these Orange Tofu Buddha Bowls, these Banh Mi Bowls, and this Thai Red Curry Soup!
A Few Final Thoughts:
- I strongly recommend using a Silicone Mat for this recipe; otherwise, your Tofu will not become as crispy.
- Prefer extra-firm Tofu? Freezing (and then thawing) your Tofu will provide a spongier, chewier texture.
- Feel free to add in extra seasonings with the Nutritional Yeast! Some of my favorites include Smoked Paprika, Garlic Powder, Black Pepper, or Toasted Sesame Seeds.
Finally, if you make this recipe and decide to share it on Facebook or Instagram, don’t forget to tag me @FromMyBowl + #FromMyBowl! I love seeing your delicious recreations 🙂
The EASIEST Crispy Tofu Recipe

Learn how to make the best Crispy Tofu with this easy and yummy recipe! Made with only 3 ingredients, this Tofu is Vegan, Gluten-Free, and Oil-Free.
- Prep Time: 10 Minutes
- Cook Time: 40 Minutes
- Total Time: 50 minutes
- Yield: 2-4 Servings 1x
- Category: Main
- Method: Oven
- Cuisine: American
Ingredients
- 1 14 oz. block Extra Firm Tofu
- 1 tbsp Reduced-Sodium Tamari
- 2 tbsp Nutritional Yeast, plus more to taste
Instructions
- First, preheat the oven to 425F. Drain the liquid from the Tofu and “press” the extra liquid out by wrapping it in a clean dish towel, or by using a Tofu press. Try to get it as dry as possible!
- Cut the Tofu into even cubes. I like to cut the block in half lengthwise, then cut each rectangle into 16 even cubes. (Note: I like to lightly press the cubes with the dish towel if I have extra time/patience)
- Add the cubed Tofu to a large bowl, then use a spatula to gently toss it with the Tamari, until evenly coated. Add the Nutritional Yeast, then gently mix until coated. Add more Nutritional Yeast or extra seasonings to taste, if desired.
- Transfer the cubes to a baking sheet lined with a silicone mat, leaving space between the cubes. Bake on the top rack of the oven for 20 minutes, then carefully flip the cubes. Bake for another 20-30 minutes, depending on how crispy you like your tofu. The Tofu will also get slightly crispier as it cools.
- Serve as desired; leftovers will last in the fridge for up to one week.
Notes
- Tamari may be substituted for Liquid Aminos or Soy Sauce (not GF). I do not recommend Coconut Aminos as I find it to be too sweet.
- I strongly recommend using a Silicone Baking Mat for this recipe; otherwise, your Tofu will not become as crispy.
- Prefer extra-firm Tofu? Freezing (and then thawing) your Tofu will provide a spongier, chewier texture.
- Feel free to add in extra seasonings with the Nutritional Yeast! Some of my favorites include Smoked Paprika, Garlic Powder, Black Pepper, or Toasted Sesame Seeds.
Want to save this Crispy Tofu recipe for later? Pin the recipe to your Pinterest boards:


Loved this! Thank you for sharing Caitlin 😊
You’re so welcome, Liz!
I’ve made a lot of oil free tofu and this is definitely the crispiest one ever! I did used Braggs Liquid Aminos and baked on a Silpat. Great texture and flavor, crunchy, chewy, and even held up in a curry-like sauce I threw them in right before serving. I’ll definitely make this tofu over and over again. Thank you!
You’re so welcome, Tracy!
Amazing recipe!!! Made it with roasted veggies and served it with a lemon tahini dressing from the Simply Delicious cookbook:)
Thank you, Rachel!
Do you think I could place the cubes on a mesh rack and then skip the step of flipping them midway through? I have a convection setting and am thinking the heat would be able to circulate all around the tofu as it is sitting on the raised mesh rack. (Thank you for sharing your recipe and experience! I can’t wait to try this! And I love that there’s no oil!)
Yes, you can actually do that, Natalie!
Every crispy tofu recipe I’ve ever tried calls for oil. This was an absolute revelation! No oil, and it ended up being the best, crispiest, most delicious tofu I’ve ever made!
Yay, love to hear that Vincent!
This recipe is definitely IT! We’ve moved significantly to vegetarian meals and while I thought I was pretty capable @ working up tofu, I spent too much time on maintaining the crunch crust. The yeast w/tamari (Ihad to use soy for my first try – and it was perfect). The pile of crunchy cubes with tender inside dip wonderfully for any meal. Great with seafood salad etc. Thank you hugely!
So glad you found this recipe, Stacey!
This is my go to crispy tofu recipe! It is easy and tasty. It is very versatile too. I have spooned on BBQ sauce for the last 10 minutes of cooking and it worked out super. I also add this on top of stir fries, to salads, and yup just plain eat it as is. Oh, when making this, always increase the amount you make because you will find it disappears fast!
That’s awesome! Thanks for leaving a review, Kathleen 🙂
Absolutely fabulous tofu! Love it so much it so much that it’s become a staple around our house. Thanks for sharing such deliciousness! As a new subscriber, I look forward to finding more great recipes.
Welcome, Bob! I hope you enjoy all the recipes in the blog and thank you for the feedback!
Oh my goodness thank you so much for this recipe! They taste very much like the tofu at Whole Foods on their food bar! I was also baking french fries and put the tofu on the parchment paper pan instead of my silicone mat, but they still came out wonderful! I will be making them often.
Glad it turned out great, Lin! Thank you so much for the feedback.
Truly the best tofu recipe I’ve tried. This one gets the tofu perfectly crispy on the outside yet nice and tender on the inside. The healthy addition of nutritional yeast is a huge plus. I love that I can add more spices to this to make it more flavorful if I want to eat it plain or saute it in some sauce after baking. Thanks for a great recipe!
You’re always welcome, Lauren! Glad it turned out great!
This is the recipe that made me crave tofu! We’ve created so many variations over the years:
Add lime juice if using in pad Thai
Add garlic for extra zing
Add hot sauce in Mexican inspired dishes
Add lemon juice if using in risottos or pastas
I have to make multiple blocks of tofu whenever I make it because we eat it so fast!!
Those are really awesome ways to enjoy tofu. Thanks, Kimberly!
Wow, this is DELICIOUS. I wish I had come across this years ago! i was skeptical because i have tried other recipes that only have a few ingredients and they were terrible. But THIS is just great. I am making a second batch now after loving the first one. Thank you!
I’m glad you stumbled upon my recipe, Jen. ♥
Newbie to tofu here… and recent convert to vegan. And this was literally the very first time I ever had tofu. I was skeptical but willing to try it to get some protein. I REALLY enjoyed it. Kind of reminded me of potato on the inside, but with a great crunch on the outside. Served it with quinoa and red bell peppers – color me happy 🙂 I was surprised how much tofu shrinks when cooked, guess I’ll just have to buy more! Thanks for a great intro to this protein source.
Hi Caitlin,
Loved this recipe!! (And….your book as well!)
For this recipe I used Nasoya organic super firm tofu (16 oz) and prepared as written. Added a bit more tamari and NOOCH. Was going to bake in oven on a silpat, but decided to try it in my Ninja air fryer.
Decided on 375° for 15 minutes. Checked it a few times to rearrange the tofu, ensuring that each piece had a fair chance at getting crispy. (There was tofu shrinkage….😉)
Shut air fryer off at 14 minutes because the crispy cheesy tofu looked perfect.
Was planning on using the tofu for tonight’s dinner, but we ate is this afternoon!
Thank you for this quick & easy recipe!!!🥰
Have a peaceful evening,
Denise
WOOOOOOOOOW. I’ve made tofu for YEARS. Finally used this recipe and wow, this was my best outcome thus far. Thank you Caitlin!!! The only downside is that I ate the tofu before the rest of my meal was ready! 😀 😀
I love making this for lunch for me and my kiddos! I pop them into the air fryer and they’re just perfect!
I added garlic & onion powder, salt and pepper and air fried them at 390 for 13 minutes – PERFECTION! Thank you for sharing, I never used or honestly heard of nutritional yeast and it made a huge difference in the texture, wow!
Seriously, this recipe is perfect! And it couldn’t be easier. It’s so delicious, not much is leftover by the time it cools! This is a weekly staple for me. I make it with liquid aminos instead of tamari or soy sauce. This tofu is good in just about anything.
Thank you for another amazing, healthy recipe, Caitlin!
I make a lot of Caitlin’s recipes but this is hands down my favorite. In the last 2 years (it has been published 2 years ago) I make this crispy tofu at least once a week. My 3 year old eats this tofu like candy. I think is his favorite food besides avocado. If you don’t like tofu try this recipe and you might start loving it.
This is an AMAZING recipe!! Incredible! Problem – it’s so addictive I ate most of the tofu before I could add it to the pad thai I was making it for. I have a vintage gas oven and am at 5600′ elevation, so I found my cooking times to be a little shorter – 20 mins on the first side, and then definitely plenty crunchy by 15 mins on the other side. I cut the block of tofu into four flattish pieces and pressed those with paper towels several times (since I didn’t want to dirty a dish towel and dont have a tofu press), and that seemed to work well. After further cutting into cubes, they absorbed the tamari right away and I even added a dash more to make sure each was coated before tossing in the amazing “nooch”! Thank you for this recipe!