Disclosure: This post may contain affiliate links. I may earn a small commission for my endorsement, recommendation, testimonial, and/or link to any products or services from this website.
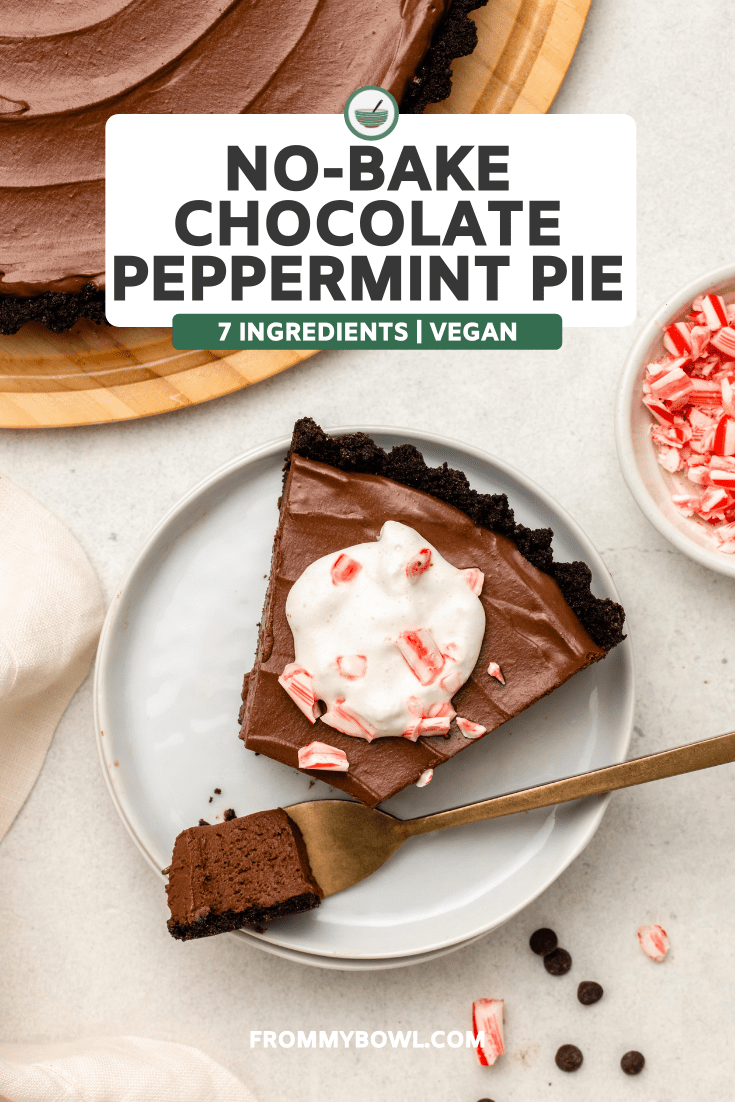
This No-Bake Chocolate Peppermint Pie is THE BEST decadent, double chocolate dessert for the holidays! A buttery chocolate cookie crust with a creamy peppermint chocolate filling. Gluten-Free Option.
This No-Bake Chocolate Peppermint Pie is based off of my fuss-free, No-Bake Chocolate Tart, but with a peppermint twist! A cool, rich chocolate pie filling atop a crisp, buttery Oreo crumb crust that will leave your mouth watering with every bite. Trust me, this is one of those desserts that make you want to sit back, close your eyes, and take in the moment while you eat 😉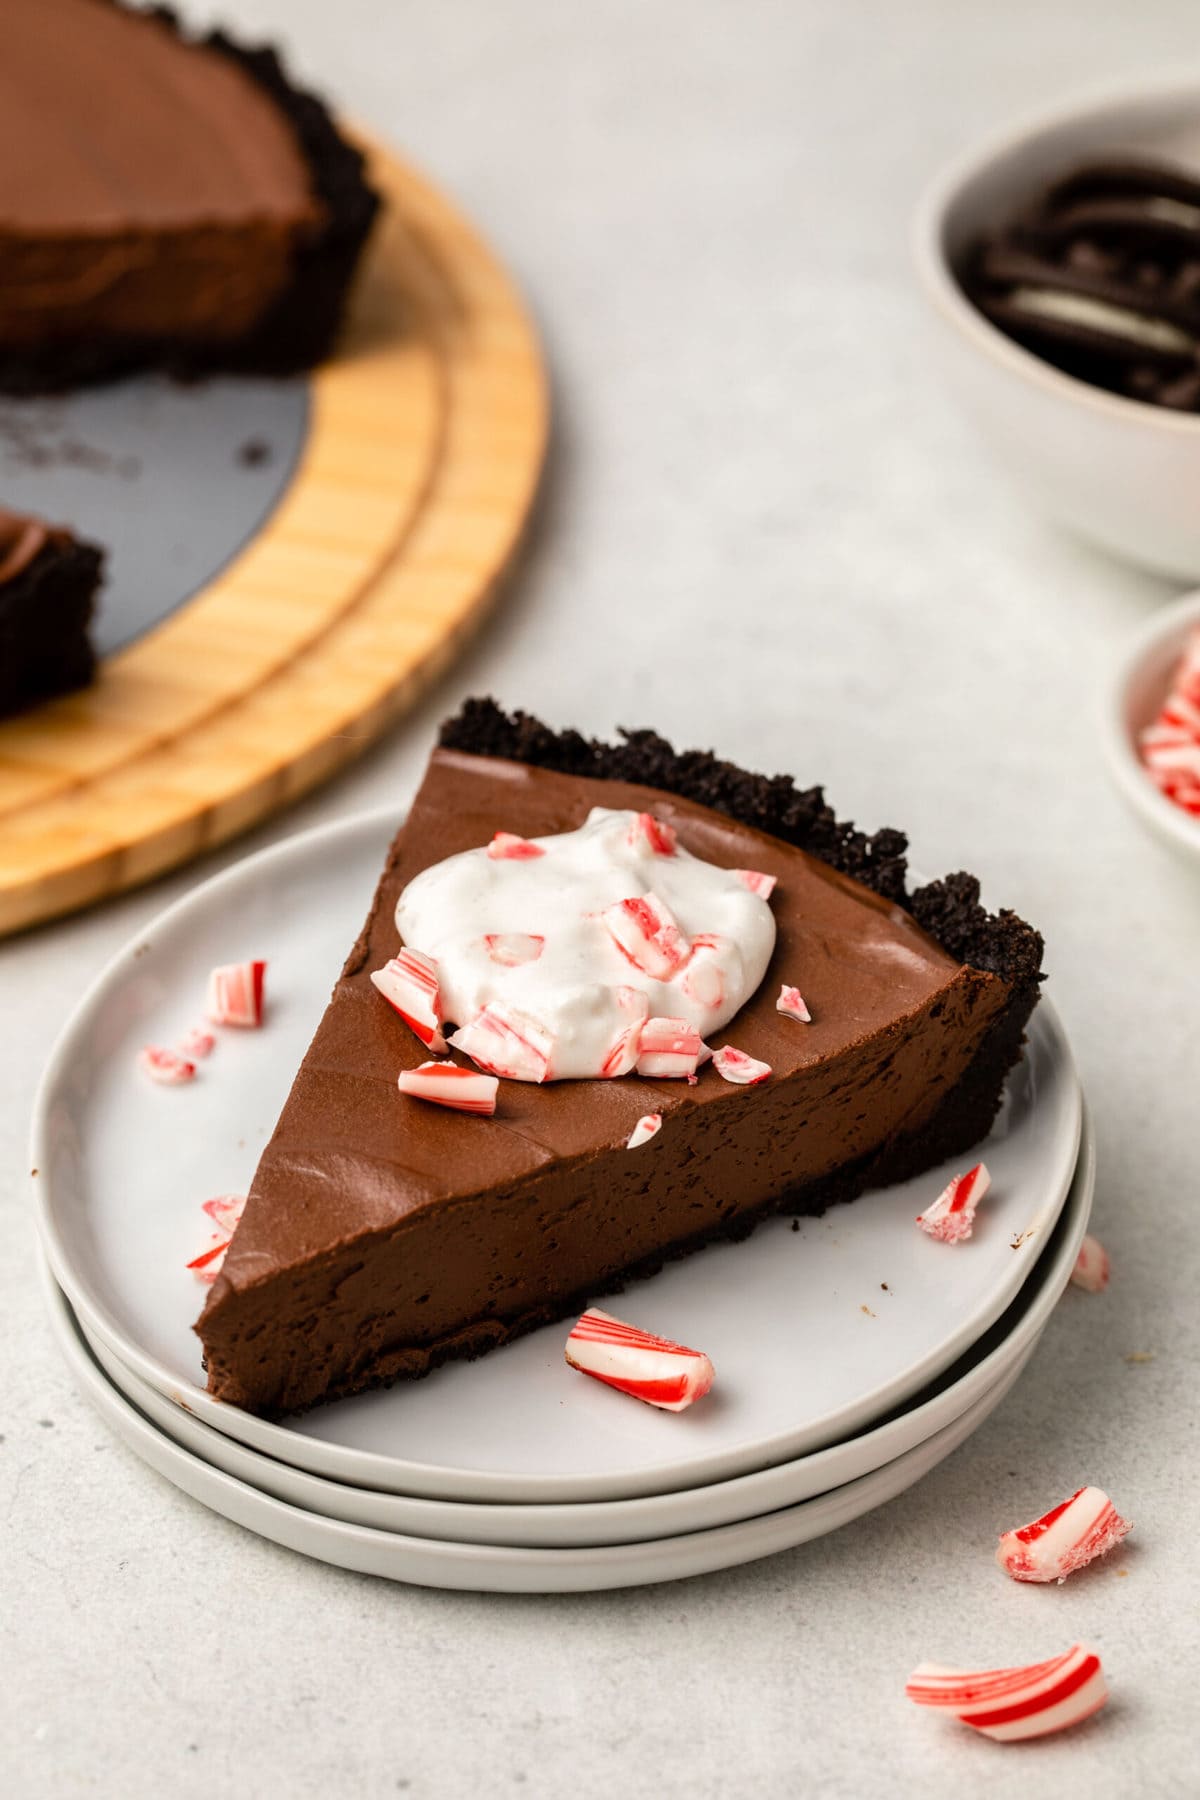
INGREDIENTS + INSPIRATION
What’s not to love about no-bake recipes!? They’re minimal in ingredients and because you don’t need to turn on your oven, they’re completely fuss-free! And if you know my no-bake chocolate pies, you know that the chocolate filling is extra rich in flavor because of a special secret ingredient: a touch of brewed coffee. Definitely don’t skip it! It only adds a minimal amount of caffeine, and doesn’t taste like coffee at all! It actually makes the pie taste like a creamy dark chocolate peppermint bark…highly recommend.
As for the crust, when I asked my readers on Instagram what they would prefer for this recipe, the majority voted for an Oreo cookie crumb crust. If you’d like to make a nut & date-based crust, see the recipe notes for a substitution. It’s just as yummy, but with a touch of delicious nutty flavor!
HOW TO MAKE NO-BAKE CHOCOLATE PEPPERMINT PIE
This pie is so easy to make—it only takes 10 minutes of prep and the rest of the time is spent in the fridge to chill! All of the ingredients are pantry and budget-friendly, and you can easily make customizations to your liking (just see the recipe notes below).
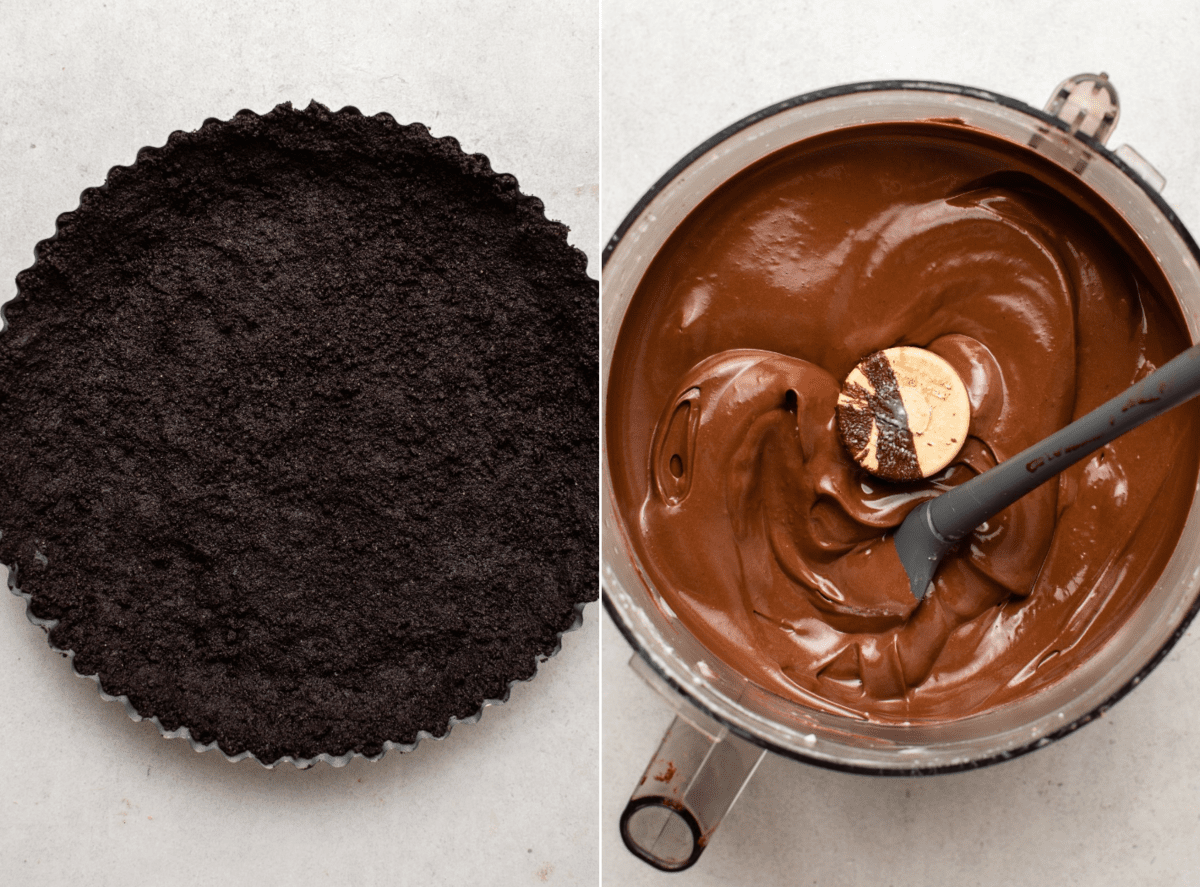
- Pulse the Oreo cookies in a food processor, then add melted butter and continue processing until a dough ball forms. Press the dough into the dish to form a pie crust, set aside.
- Pulse the tofu, milk, coffee, and peppermint extract in the processor until smooth, then add the melted chocolate and continue to blend into a chocolate “pudding.”
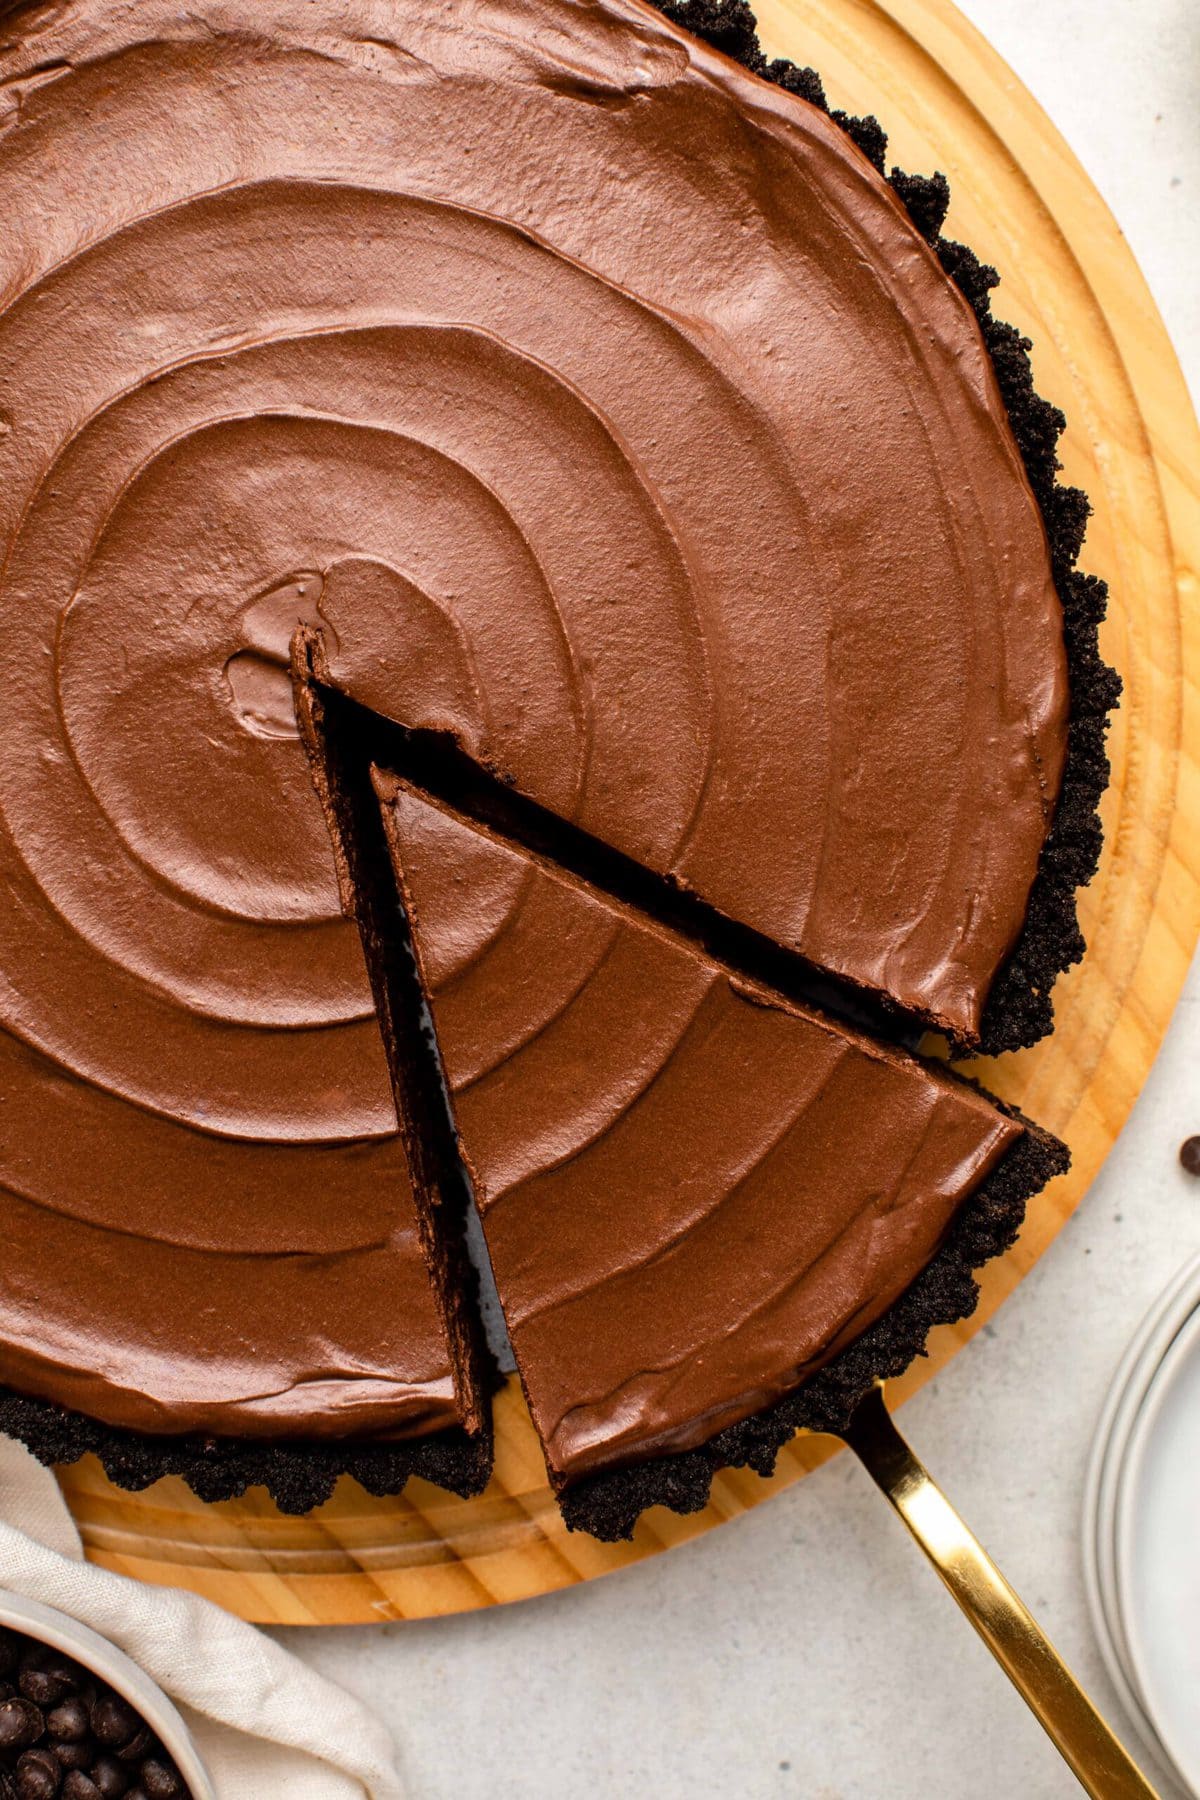
- Pour the chocolate mixture into the pan and refrigerate to set.
- Slice and enjoy!
Is it just me, or are pies pretty much the best dessert to bring to holiday get-togethers? No one can resist indulging in a slice of decadent chocolate pie! But don’t wait for your next holiday party, this dessert is a wonderful weeknight dessert too 😉 Enjoy on its own, with a glass of plant-based milk, or with a scoop of vegan ice cream!
COOKING TIPS + FAQ:
- Topping Ideas: This pie would be so tasty with a dollop of coconut whipped cream or maybe a little drizzle of melted chocolate and a few mint leaves! You could even sprinkle on some crumbled peppermint candy cane pieces or extra cookie crumbs for a yummy crunch on top 😉
- Can this be made with other cookies? Yes! Any chocolate sandwich cookie will do here. You could also try this with the all-vanilla variety, or even double down on the peppermint with some of the seasonal peppermint chocolate sandwich cookies that come out around the holidays! If you’d like to make this recipe gluten-free, simply swap for gluten-free sandwich cookies instead!
- A Tofu Tip: Scoop your tofu out into a bowl and drain it just before adding it to the food processor so that the tart texture is nice and thick! Allowing the tofu to sit for a little before processing makes the draining process even more effective – more of the liquid will naturally fall out of it.
- Storage:Store any leftovers in the fridge for up to 7 days or freeze slices for up to 2 months. In fact, it’s incredibly delicious when it’s super cold as it’s thawing from the freezer!
If you’re looking for more fuss-free pies for the holidays, you’ll also love this Best Ever Vegan Pecan Pie, this No-Bake Vegan Peanut Butter Cup Pie, and this Pumpkin Custard Pie!
Finally, if you make this recipe and decide to share it on Facebook or Instagram, don’t forget to tag me @FromMyBowl + #FromMyBowl! I love seeing your delicious recreations 🙂
No-Bake Chocolate Peppermint Pie

This No-Bake Chocolate Peppermint Pie is THE BEST decadent, double chocolate dessert for the holidays! A buttery chocolate cookie crust with a creamy peppermint chocolate filling. Gluten-Free Option.
- Prep Time: 10 Minutes
- Cook Time: 2 Hours
- Total Time: 2 hours 10 minutes
- Yield: Serves 8 to 10 1x
- Category: Dessert
- Method: No-Bake
- Cuisine: American
- Diet: Vegan
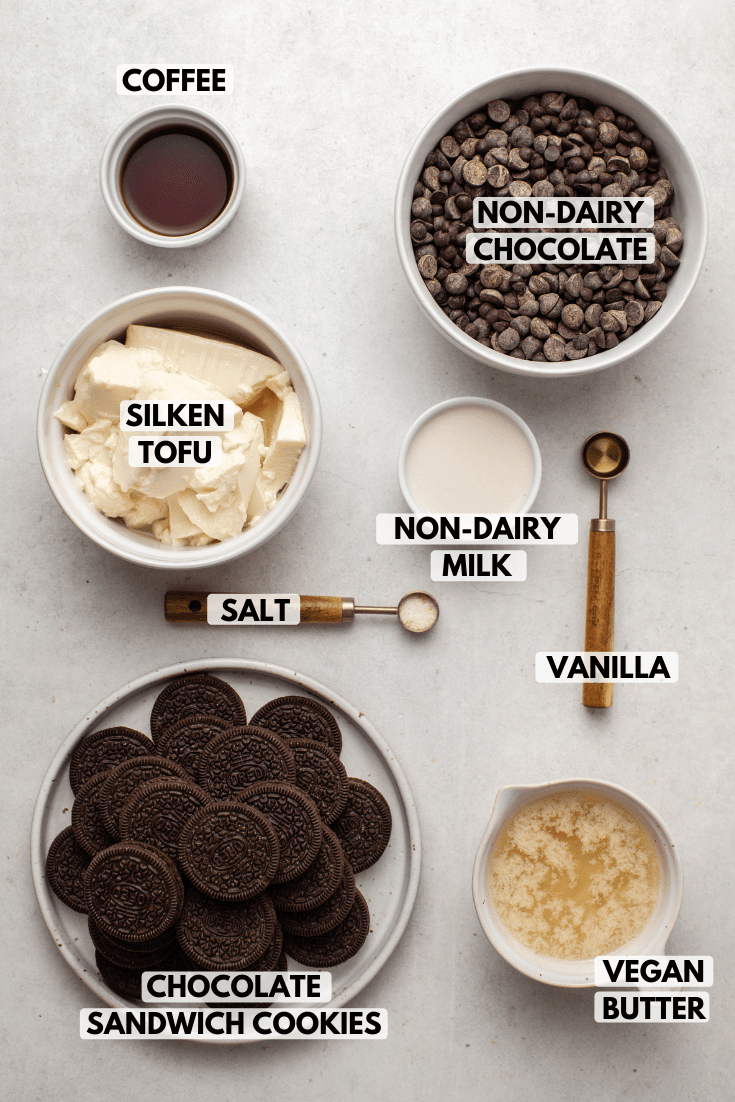
Ingredients
For the Crust:
- 25 Oreo cookies,* roughly chopped
- 6 tablespoons salted vegan butter, melted (see notes for substitutions)
For the Filling:
- 12 ounces (340 g) dairy-free semisweet chocolate chips
- 12.3 ounces (350 g) silken tofu*, drained
- 1/4 cup (60 ml) non-dairy milk (I used oat milk)
- 2 tablespoons brewed coffee (for a deeper chocolate flavor – or sub more milk)
- 1 teaspoon peppermint extract
- ½ teaspoon salt
- Optional toppings: coco whip/coconut cream, crushed candy canes, chocolate chips, mint leaves, etc
Instructions
- Prep: Grease a 9′ tart or pie dish and set aside. Melt the butter.
- Crust: Add the Oreo cookies to a food processor with a S-blade attached. Pulse a few times to get a crumbly texture, then add in the melted butter. Process for 45 to 60 seconds, scraping the sides as necessary. A uniform ball of dough that is slightly crumbly should form. Press the dough into the tart dish and set aside.
- Melt the Chocolate: melt the chocolate using either the microwave or a double boiler
- Microwave – chop the chocolate roughly into small chunks and place in a microwave-safe bowl. Microwave for 60 seconds, then use a clean and dry spatula to stir well; continue to microwave the chocolate in 20 second intervals, pausing to stir well. Once the chocolate is 80% melted, remove from the microwave and stir with the spatula until completely melted.
- Double-Boiler – fill a sauce pan with 1-2″ of water, then place a glass bowl over the top. Bring the water to a boil over high-heat, then reduce to medium-low heat. Chop the chocolate roughly into small chunks and place in the glass bowl. Allow the heat from the bowl to melt the chocolate, using a clean and dry spatula to stir well. Continue warming the chocolate until it is 80% melted, then carefully remove the bowl from the pot. Stir with the spatula until completely melted.
- Filling: Quickly rinse out the food processor and return to the base. Add the tofu, milk, coffee, and peppermint extract to the processor and pulse until a smooth texture forms. Use a spatula to add the melted chocolate to this mixture, then process for an additional 45 to 60 seconds, until a thick and shiny chocolate “pudding” forms.
- Let it Set: Transfer the chocolate filling into the pan and use a spatula to spread it around evenly (or make a fun design! Place the tart into the fridge for at least 4 hours to let the chocolate thicken and set.
- Serve: remove from the refrigerator, slice, and serve as desired. Leftovers will keep covered in the fridge for up to 5 days, or can be pre-sliced and frozen for up to two months. If you freeze, let the slices thaw and come to room temperature before serving.
Notes
- Oreo cookies: any chocolate sandwich cookie with an icing filling can be used for this recipe. Gluten-free sandwich cookies should work as well.
- Tofu: I used the silken tofu that comes in the refrigerated section of the grocery store; if you purchase shelf-stable tofu, opt for the “firm” variety. Pro-tip: I like to scoop the tofu into a bowl, then drain it just before adding to the food processor for a thicker tart texture. The tofu gradually releases water as it sits.
- Other Substitutions: the vegan butter can be replaced with refined melted coconut oil as well. For an oil-free version you can replace the butter with 1/2 cup nut butter, but keep in mind that this will affect the final flavor of the dish and the crust will not be firm. You can use a chopped chocolate bar in place of chocolate chips, but I actually prefer chips in this recipe as they are made with a food-grade wax and create a firmer filling 🙂


I’ve made this several times and love it! I’m now hoping to make it for a friend’s baby shower and I’m hoping to adapt this into something bite size. Do you think this would set in a mini cupcake pan? Thank you!
So happy you love it! I’m not sure how well it would come out of a mini cupcake pan because there is no removable bottom like a tart pan. Let me know if you try it out though!
Can’t wait to try this recipe! Will it work to use a blender for the filling since i don’t have a food processor?
Yes! You may need to scrape the sides down a few times but it will work
I made this pie, and it was fabulous! I put the filling in a pre made Oreo cookie crust to save myself some extra cleanup. I’ll definitely make this dessert again and again! I will also add, that the recommended amount of the peppermint extract was perfect!
That sounds lovely, Barbara! Great idea 🙂
This was delicious, but i’d recommend putting it in the tart pan, not the pie pan. I was traveling for Thanksgiving, so I didn’t have one. I found it hard to get the pie slices out of the pie pan, and the presentation would have been up a notch in the tart pan. Also, I wouldn’t drain the tofu for quite as long next time. The pie crumbled a little. But i’m definitely trying it again in the tart pan at home! The flavor was delicious with the mint Neuman O’s.
Very insightful. Thank you, Miranda!
This was the first time I’ve used silken tofu and was surprised at how amenable it was to the other flavors. I used dark chocolate and dark chocolate Oreo thins. Very decadent. My wife said it was like something from a restaurant. Highly recommend.
Glad it turned out great, Jay!
This pie was such a hit with my non-vegan family members over the holiday! I wasn’t able to add the coffee, and for the chocolate I did 2/3 semisweet and 1/3 dark. My family likes their chocolate! I also used Glutino’s gluten free chocolate sandwich cookies for the crust, which turned out perfect.
If you are someone that likes chocolate peppermint, then don’t walk, rather run to make this recipe! This is such an easy, quick pie to make. Thank you, Caitlin!
You’re welcome Anna! So glad everyone loved it!
I’m so bad at remembering to leave reviews but absolutely had to for this.. Made this recipe for our big holiday meal dessert and daaang it blew everything else out of the park! I may play around with lowering the peppermint a tad next time just for my own taste but otherwise it was absolutely perfect! Took some around to non vegan family to try and they couldn’t believe it was vegan let alone made of tofu. Dangerously easy also, will likely find any excuse to make it again!
Thank you so much for the feedback, Georgia. Glad you and everyone loved it! Happy new year!
This was really easy and a hit! I added more peppermint, a touch of sweetener and topped it with pecans, coconut shreds and crushed scotch fingers. So delish!
So happy to know it was a hit! Thank you so much!
This recipe is a total winner, needs only about 20 mins of effort and even then, the blender does all the work! Definitely saving it for any time I need a quick dessert that’s simple yet decadent.
I didn’t give it the full 5 stars though, because it was a tad too sweet for my liking. I followed the recipe to the T, even weighing the ingredients over using a cup measure. Next time, I’d use maybe 300g chocolate chips. But that’s likely just how my friends and I like our desserts and very subjective 🙂
Thank you, Sam! 🙂