Disclosure: This post may contain affiliate links. I may earn a small commission for my endorsement, recommendation, testimonial, and/or link to any products or services from this website.
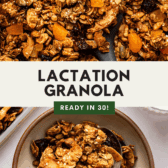
This Lactation Granola is loaded with crispy, golden oat clusters and made with everyday ingredients that can support a healthy milk supply for breastfeeding mothers. Vegan, Gluten-Free Option.
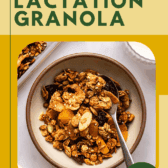
This Easy Lactation Granola is a fantastic nursing snack with the most amazing oat clusters! Made with simple ingredients, like rolled oats, nut butter, and coconut, it’s both kind to your wallet and your breastmilk supply. I created this recipe with mothers in mind, but anyone is welcome to enjoy it.
Table of Contents

What is Lactation Granola?
This Lactation-Friendly Granola is a wholesome snack or breakfast made from a variety of nuts, seeds, and galactagogues (foods that can help support a healthy milk supply for breastfeeding moms). There are all kinds of foods that are supposed to help with lactation, and this granola packs a lot of them into one easy recipe.
If you follow me on Instagram, you know that I welcomed my son to the world in October 2025. Becoming a mom has been life-changing and opened my eyes to a whole new world! It’s changed my eating habits, too.
I have a lot of vegan granola recipes on my blog, but I created this one because store-bought lactation support products (like lactation cookies) are seriously expensive! The freedom of making my own from scratch is priceless. I’m able to stick to a budget and customize the ingredients and flavors just how I like.
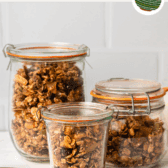
I’ve been treating myself to a bowl of this homemade lactation granola almost every morning since. It’s easy to make and has the most delicious golden clusters! Nutty, warm, and comforting, it’s officially my new favorite nursing snack.
Ingredients for Vegan Lactation Granola
I loaded this vegan granola with galactagogues (ingredients that can boost a mother’s breastmilk supply) that I love to eat and have in my pantry almost at all times. These are the key ingredients you need:

- Rolled Oats: old-fashioned rolled oats are best for homemade granola because they hold their shape and become crisp after baking.
- Nuts: both almonds and walnuts pack the granola with healthy fats and protein.
- Seeds: pumpkin seeds (pepitas), sesame seeds, and ground flaxseed bring some more crunch.
- Brewer’s Yeast: this natural probiotic is usually reserved for beer and bread, but it’s a popular lactation-boosting ingredient as well! I buy my brewer’s yeast from my local health food store, but you can also buy it online.
- Nut Butter: almond butter was my pick, but peanut butter or cashew butter would also be delicious. You can use smooth or chunky nut butter, as long as it’s from a fresh jar. The runnier it is, the better.
- Dried Fruit: the baked granola is finished with a sprinkle of the dried fruit of your choice. Dried cherries, cranberries, raisins, apricots, or dates will all add some sweetness to every bite.
How to Make Lactation Granola

- Mix the rolled oats, almonds, walnuts, coconut, pumpkin seeds, sesame seeds, flax, brewer’s yeast, cinnamon, and salt together in a large bowl.
- In a separate small bowl, combine the melted coconut oil with the maple syrup, nut butter, and vanilla.
- Combine the wet ingredients with the dry ingredients. Transfer the mixture to a baking sheet and spread the granola evenly across the pan.
- Bake for 12 minutes, then flip/mix the granola. Continue baking until the oats are golden and the nuts are fragrant.
- Sprinkle the dried fruit evenly over the granola, then let it cool completely before serving or storing for later.
Caitlin’s Cooking Tips
- Opt for drippy nut butter. A smooth and runny nut butter is your best bet here because it will mix effortlessly into the wet ingredients. If there are big chunks of nut butter left behind, try microwaving the wet mixture for a few seconds to soften it.
- For the crunchiest granola clusters, press down on the granola mixture with a spatula when spreading it out on the baking sheet. This will essentially glue everything together, giving you big, crunchy clusters in the end.
- Always let the granola cool completely. It needs at least 45 minutes to cool down before you break it into clumps. This is the secret to the crispiest granola!
Serving Suggestions
If I’m being honest, I usually just grab a handful of this granola whenever I’m hungry. All of those healthy fats and the plant protein keep me going for at least an hour or two. But when I have the time for a sit-down breakfast or snack, I’ll put a little more effort in.
I love to keep it classic and serve vegan granola with milk or sprinkle it over a vegan yogurt bowl with fresh fruit. When I’m really hungry, I’ll make my Chocolate Hemp Smoothie and add a few crunchy oat clusters and a drizzle of almond butter on top.
If you’re looking for more easy granola recipes, you’ll also love this Chocolate Hazelnut Granola, this Pumpkin Spice Granola, and this Peanut Butter Cup Granola!
How to Store Leftover Granola
The completely cool granola clusters will keep for up to 2 weeks at room temperature. I like to store it in a large airtight container in my pantry. This makes it easy to grab a handful whenever I get hungry!
Freezing isn’t recommended.

Substitutions and Variations
- Gluten-Free Option: Swap the regular oats for certified gluten-free oats for a gluten-free recipe.
- Nut-Free Option: Just replace the nuts with an equal amount of your favorite seeds, and use tahini instead of nut butter.
- Coconut Chips Substitute: I find that this granola is best when it’s made with coconut chips, but coconut shreds work, too. Just don’t use shredded coconut because it tends to burn in the oven (you can always sprinkle it over the baked granola at the end if you want).
- Change the Nuts: Feel free to swap the almonds or walnuts for any nuts you like! Macadamia nuts, pecans, or cashews would be delicious here. Just keep the quantities the same so the total volume doesn’t change.

Recipe FAQs
The healthy ingredients in this granola recipe will support a breastfeeding mom’s nutrition, which can help with her milk supply. However, there isn’t enough strong scientific evidence that the galactagogues in lactation granola can increase breastmilk supply.
I haven’t tried making lactation granola bars, but it should work well. To do so, firmly press the oat mixture into a parchment-lined 9×9” baking tin and bake at 350ºF for 25 to 30 minutes or until the top is golden, firm, and crisp. Cool the granola completely before removing it from the pan and slicing it into bars.
You can add whatever you want! Some popular add-ins include citrus zest (orange, lemon, etc.), dairy-free chocolate chips (sprinkled on top after baking), peanuts, sunflower seeds, and a pinch of pumpkin pie spice or nutmeg.
Enjoy! If you make this recipe and decide to share it on Facebook or Instagram, don’t forget to tag me @FromMyBowl + #FromMyBowl! I would also love it if you could leave a comment below with a recipe rating! Thank you for the support 😊

Easy Lactation Granola
Ingredients
- 3 cups rolled oats
- 1/2 cup slivered almonds
- 1/2 cup walnuts
- 1/2 cup coconut chips or thick-cut shreds* (optional)
- 1/2 cup pumpkin seeds
- 1/4 cup sesame seeds
- 1/4 cup ground flax seed
- 2 tablespoons brewers yeast optional
- 1 teaspoon ground cinnamon
- 1/4 teaspoon kosher salt
- 1/2 cup melted refined coconut oil or olive oil
- 1/2 cup maple syrup
- 1/4 cup almond butter or tahini
- 1 tablespoon vanilla extract
- 1/2 cup dried cherries or sub raisins
- 1/2 cup chopped apricots or dates
Instructions
- Prep: Preheat the oven to 350F and set a large baking sheet off to the side.
- Dry Ingredients: Add the rolled oats to a large bowl along with the almonds, walnuts, coconut, pumpkin seeds, sesame seed, flax, brewer’s yeast, cinnamon, and salt. Mix well until combined.
- Wet Ingredients: Add the melted coconut oil to a small bowl and add in the maple syrup, nut butter, and vanilla. Use a spatula or whisk to combine; the mixture does not have to be completely uniform, but you want the nut butter to have dissolved into the other liquid ingredients with no big chunks.
- Combine: Pour the wet ingredients into the bowl with the dry ingredients and use a spatula to mix well. Transfer the mixture to the baking sheet and use the same spatula to spread it evenly across the pan, pressing down slightly to form better clumps.
- Bake: Bake in the middle rack of the oven for 12 minutes, then remove from the oven and do your best to flip/mix the granola. Spread it out across the baking sheet and press it down, then return to the oven and bake for another 10 to 12 minutes, until the oats are golden and the nuts smell fragrant.
- Cool: Remove the baking sheet from the oven and place it on a wire rack. Sprinkle the dried fruit evenly over the baking sheet, then let the granola cool completely for at least 45 minutes – this is where the final “crisp” happens and clusters form!
- Serve & Store: Use a spatula to break the granola into smaller pieces (or keep the larger clusters). Store in an airtight container at room temperature for up to 2 weeks. Enjoy on its own for a healthy snack, or serve over yogurt, smoothies, with fruit, or as desired.
Recipe Video
Recipe Notes
- Gluten-Free: Use gluten-free certified oats to make this recipe gluten-free.
- Mix & Match: If you don’t have all of the nuts and seeds listed that’s totally okay – just replace with the ones you have so the total volume remains the same.
- Coconut: I recommend using coconut chips for this recipe, but if you can find coconut shreds that are a thicker cut you can use those, too. Standard shredded coconut will burn in the oven so I do not recommend using that.


What size of airtight container does this fit into? 32 oz?
Hi Shellie, it makes quite a large batch! I usually use 2-3 glass jars that hold around 4 cups, which is 96 ounces. If you want to make less you can cut the recipe in half! It will also fit in a gallon sized ziploc bag, but I notice that the granola tends to go stale a little faster with that method of storage.
Ok WOW. This is better than any store-bought granola!! I poured this on my green smoothie this morning and I immediately came to write a review! I chopped up deglet dates for my fruit and followed the recipe to a T, except I added only 1 T of brewer’s yeast. Next time I may add 2 as i can’t taste it. Sooo crunchy and flavorful and fresh! I’ll be eating this every day. Thank you for another awesome recipe, Caitlin!
I’m so happy you enjoyed this one, Bri!
So so delicious – made it at 37 weeks and making again at 39 weeks. Whole family enjoys it too. So many goodies in there
So happy to hear that, Alex 🙂
Very easy to make AND extremely delish. Used natural peanut butter instead of almond and it’s divine.
Having a baby next week and looking forward to eating plenty of this guilt free!
Thank you for the review Erin! Peanut butter is a great swap! Wishing you an easeful labor and delivery <3
Switched up some of the nuts based on what I had on hand and SO GOOD! Will be making this again and again. Used tahini and loved it.
So happy you enjoyed! Tahini sounds lovely in this 🙂